The other day I ran into an issue where a customer was getting a warning that the C:\ drive was full on their somewhat new Dell Inspiron laptop. Turns out that for some reason the factory had partitioned the drive into a 60GB C:\ drive and a 180GB D:\ drive. So there C:\ drive WAS nearly full but they had plenty of space available on D:\. They didn't have any personal files on D:\, it just looked like various folders created by the system.
So what I wanted to do was allocate some of that free space on D:\ and make use of it on C:\. I could have possibly deleted the D:\ partition but that may have caused some issues since the system was obviously writing some things there already. Alternatively I could have tried to redirect the users folders (documents, pictures, music, etc.) to the D:\ drive but I needed to keep this particular laptop very simple and I didn't want to confuse matters with some files being stored on a different drive, etc.
I decided that what I really wanted to do was to shrink the massive D:\ drive down and then allocate that free space to the C:\ drive. I wasn't sure if I could do that with the built in disk management tools in Windows 7 but I wanted to give it a try. I first went into Disk Manager, found the primary disk, right-clicked on the D:\ partition and I WAS able to shrink it. Sweet. Now it showed a big block of unallocated space to the right of D:\. I now wanted to expand C: but when I right-clicked on C:\, all of those options were grayed out.
After some research, I found that Windows 7 Disk Management will only allow you to expand a partition into unallocated space if the free space is sitting to the immediate right of the current partition. Currently my disk map looked like this - System Partition -> C: -> D: -> Unallocated Space.
I found some recommendations to try out EaseUS Partition Master free home edition. It has several features including merging and resizing partitions. You can see some screenshots here. Basically you can drag some handles to resize your partitions. Initially I ended up in the same stuck situation. I dragged the handles to shrink my D:\ drive but I ended up with unallocated space to the right of the D:\ drive and this tool was still unable to either expand C:\ into the free space or merge C:\ and the free space. I discovered that it has the same limitation that it can only grow a partition into unallocated space if that space is immediately to the right of the partition.
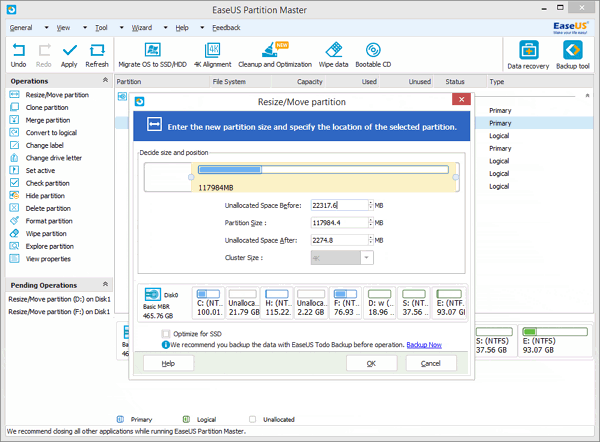
However once I figured this out, it was very easy to work around it. Partition Master lets you shrink the partitions from either the right side OR the left side (keep picturing the disc map in your head). I tried again to resize my D:\ drive but this time, I grabbed the handle on the left side and dragged it to the right. See screenshot below...
Since I did the D:\ resizing by dragging from the right to the left, this actually created unallocated space IN BETWEEN C: and D:, meaning that I should now be able to expand C: finally!
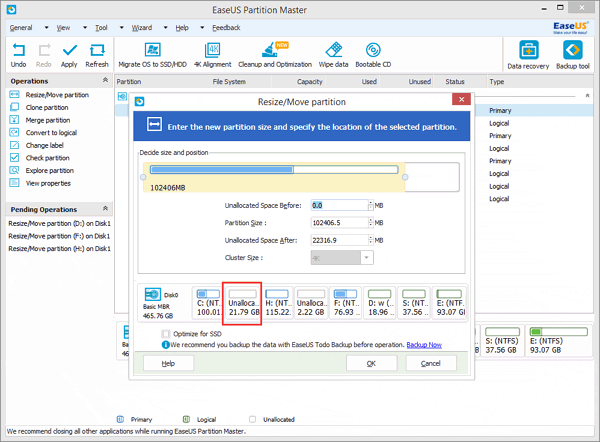
The screenshot below shows the user grabbing the handle on the C: partition and dragging it to the right, to expand the partition into the free space. (After each of these resizing operations, it does need to reboot and it does all of the disk-related tasks in a special boot environment. This process was pretty quick in my case. Maybe 20 minutes.) I now had plenty of room on the 180GB C: partition.
So definitely check out EaseUS Partition Master if you need a simple tool to work with Windows 7 partitions and the built in Disk Manager isn't working for you.
A senior IT consultant sharing news and knowledge on the latest technologies for Small Businesses.
Subscribe to:
Post Comments (Atom)
Autopilot White Glove error message We couldn't find any Provisioning Packages
I was testing out the Windows Autopilot "White Glove" feature this week. This is a new feature of the Intune AutoPilot service th...
-
There have been a few hurdles getting users connected into Windows 8 machines via Remote Desktop (RDP) or Remote Web Workplace (RWW) from S...
-
Recently after upgrading one Office 365 user from Lync 2010 to Lync 2013 , his Outlook 2010 was no longer displaying the "presence...
-
I was working on a Microsoft CRM 4.0 system the other day for one of my clients. It's mainly used for demo and testing purposes so it h...


2 comments:
nike air max
off white nike
yeezy 500
oakley sunglasses for men
lebron soldier 11
longchamp handbags
red bottom heels
air jordans
lebron james shoes
yeezy boost 350 v2
Thankks for sharing
Post a Comment